Advanced Setup with Docker
This guide covers detailed configuration, customization, and operational topics for running SpaceDF with Docker Compose.
Use this guide if you need:
- Production-ready configuration
- Security hardening
- Custom ports, domains, or authentication
- Update, maintenance, and removal procedures
If you only want to get SpaceDF running quickly with default settings, see Quick Start.
Contents
Prerequisites
Before setting up SpaceDF, you should be familiar with some basic concepts. You do not need to be an expert, but you should understand:
- Basic Linux server usage (connecting to a server, running commands).
- How Docker and Docker Compose work at a high level.
- Basic networking concepts such as ports and firewalls
Make sure the following tools are installed on your machine or server:
Install Docker based on your operating system:
- Linux server or VPS: Install Docker Engine and Docker Compose
- Linux desktop: Install Docker Desktop
- macOS: Install Docker Desktop
- Windows: Install Docker Desktop
Once these requirements are met, you are ready to start installing SpaceDF.
System requirements
Minimum requirements for running all SpaceDF Platform components, suitable for development and small to medium production workloads:
Resource | Minimum | Recommended |
|---|---|---|
| RAM | 4 GB | 8 GB+ |
| CPU | 2 cores | 4 cores+ |
| Disk | 20 GB available | 80 GB+ SSD |
Installing SpaceDF
Follow the steps below to install and run SpaceDF on your machine.
# Make your new spacedf project directory
mkdir spacedf-project

# Get the code
cd spacedf-project
git clone https://github.com/Space-DF/spacedf-core.git

# Switch to your project directory
cd spacedf-core

# Copy the env vars
cp .env.example .env

# Pull the latest images
docker compose pull
Configuration & Security
Before starting SpaceDF, you need to set up the environment variables.
Manual
Copy the .env.example file in the root directory.
Rename the copy to .env
Update the values in .env following the guide below.
⚠️ Action Required: You must replace all sample values in the .env file before starting the app.
✅ DO:
- Use strong passwords: Make them long and unique for every service.
- Use HTTPS: Always use a secure connection (https://) when your site is live.
- Keep it private: If a value says “Secret”, never share it with anyone.
❌ DO NOT:
- Do not share your
.envfile: Never upload this file to GitHub, GitLab, or share screenshots of it. - Do not reuse passwords: Don’t use the same password you use for other websites.
- Do not expose secrets: Never use these secret keys in your frontend code (browser-side).
Configuring Environment Variables
Now that you have your .env file, you need to configure the settings.
Open the file Open the .env file using any text editor of your choice.
Recommended Editors:
- All platforms: VS Code (Recommended for easier reading)
- Windows: Notepad
- macOS: TextEdit
- Linux: Nano or Vim
Update the values Review the sections below and update the corresponding values in your file.
Tag Note:
- Required These values are mandatory. SpaceDF will not start without them.
- Optional These are for advanced features. You can leave them as default or skip them for now
- Coming Soon Features planned for future updates. No action required at this time.
Backend Services
This section configures the connections between SpaceDF and your infrastructure (such as your database and cache).
These settings are the backbone of your server.
RabbitMQ Configuration
RequiredSpaceDF uses RabbitMQ to handle background tasks and internal messaging.
You need to set up credentials so the system can connect to the message queue.
Set your credentials You can choose any username and password you want.
RABBITMQ_DEFAULT_USER="your_secure_username"
RABBITMQ_DEFAULT_PASS="your_secure_password"
Variable Details:
RABBITMQ_DEFAULT_USER: The username for the connection.RABBITMQ_DEFAULT_PASS: The password for the connection.
⚠️ Important Setup Rules:
- Consistency: If you are running RabbitMQ via Docker or another service, these values must match the credentials defined there.
- Security: Use a strong password. You may need these credentials later to log in to the RabbitMQ dashboard for troubleshooting
Authentication (JWT)
RequiredSpaceDF uses JSON Web Tokens (JWT) to secure API requests. You need to generate a specific key pair for this to work.
Generate & Copy Keys
Choose your operating system below to generate and copy the keys.
macOS
1. Generate Keys Open Terminal and run:
openssl genrsa -out private_key.pem 2048
openssl rsa -in private_key.pem -pubout -out public_key.pem
2. Copy to Clipboard Run these commands to copy the keys directly (no manual selection needed):
# Copy Private Key
pbcopy < private_key.pem

# Copy Public Key
pbcopy < public_key.pemUpdate .env file
Paste the copied keys into your .env file.
⚠️ Formatting Rule: Because these keys span multiple lines, you must enclose the entire value in double quotes (""). If you omit the quotes, the server will fail to start.
Example of correct formatting:
# ✅ CORRECT (Quotes are used)
JWT_PRIVATE_KEY="-----BEGIN RSA PRIVATE KEY-----
MIIEpQIBAAKCAQEA...
... (your long key content) ...
...O4zXk=
-----END RSA PRIVATE KEY-----"

JWT_PUBLIC_KEY="-----BEGIN PUBLIC KEY-----
MIIBIjANBgkqhkiG...
... (your long key content) ...
...IDAQAB
-----END PUBLIC KEY-----"
Google OAuth
OptionalEnable this to allow users to sign in to SpaceDF using their Google accounts.
You will need to generate credentials in the Google Cloud Console.
1. Get Credentials
Follow these steps to create your Client ID and Secret.
Go to the Google Cloud Console
Create a new project (or select an existing one).
Configure Consent Screen
- Go to APIs & Services > OAuth consent screen.
- Select External and click Create.
- Fill in the required App Information (App name, User support email) and click Save.
(You can skip the Scopes and Test Users sections for now).
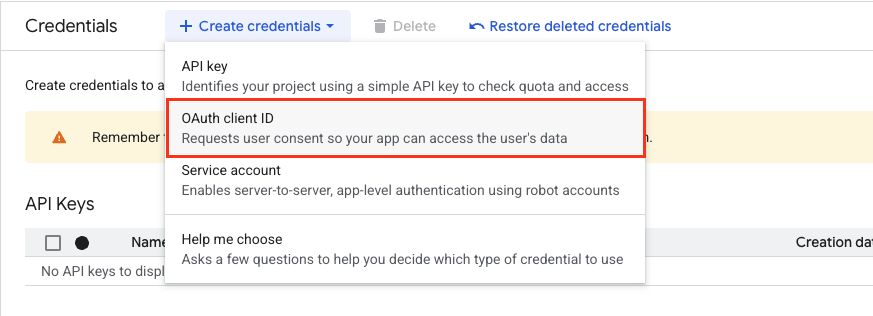
Create Credentials
- Go to APIs & Services > Credentials.
- Click + Create Credentials and select OAuth client ID.
- Application type: Select Web application.
- Name: Enter a name (e.g., “SpaceDF Self-Hosted”).
Set Redirect URI (Important) Scroll down to Authorized redirect URIs and click Add URI.
Enter the URL based on your environment:
 # Production
 https://your-domain.com/auth/google/callback

 # Development
 http://localhost:3000/auth/google/callback
Note: This URL must match exactly what you put in the .env file later.
Copy Keys Click Create. A popup will appear with your Client ID and Client Secret. Copy these values.
2. Update Environment
Open your .env file and paste the values you just obtained.
Connection Settings
# 1. The URL you configured in Step 4 above
GOOGLE_CALLBACK_URL="http://localhost:3000/auth/google/callback"

# 2. The Client ID from Step 5
GOOGLE_CLIENT_ID="your-client-id.apps.googleusercontent.com"

# 3. The Client Secret from Step 5
GOOGLE_CLIENT_SECRET="your-client-secret"
Variable Details
GOOGLE_CALLBACK_URL- Where Google sends the user after login. Must match the URI in Google Cloud Console exactly.GOOGLE_CLIENT_ID- The public identifier for your app.GOOGLE_CLIENT_SECRET- The secret key to authenticate your app. Keep this private.
Apple OAuth
Coming SoonSupport for “Sign in with Apple” is currently in development. It is not enabled in this version of SpaceDF.
ℹ️ No Action Required: You can safely skip this section. Please leave these values blank or commented out in your .env file.
# Apple OAuth (Reserved for future updates)
# Leave these lines commented out for now:
# APPLE_CLIENT_ID=
# APPLE_CLIENT_SECRET=
# APPLE_CLIENT_KEY=
# APPLE_CERTIFICATE_KEY=
Auth Service
RequiredThe Auth Service manages user logins and security. You need to configure its database connection and domain settings.
1. Security Credentials
Set up the password for the database and the encryption key for sessions.
Generate a Secret Key: Run this command in your terminal to get a secure random string:
openssl rand -hex 32Update .env: Copy the generated string and your database password into the file:
# 1. Database Password (Make sure it is strong)
AUTH_POSTGRES_PASSWORD=your_secure_db_password

# 2. Secret Key (Paste the output from Step 1)
AUTH_SECRET_KEY=paste_generated_key_here
2. Tenant Configuration
This defines the main domain where your application runs.
⚠️ Format Note: Do not include http:// or https://. Only enter the domain name
Development
For Localhost: Use this if you are running SpaceDF on your own computer.
DEFAULT_TENANT_HOST=localhostS3 Service
RequiredSpaceDF uses Amazon S3 to store uploaded files, assets, and generated data.
You need to provide IAM Credentials so SpaceDF can access your storage securely.
ℹ️ Note: Currently, SpaceDF supports Amazon S3 only.
Other providers (like Google Cloud Storage or MinIO) are not yet supported.
If you do not already have an AWS account, create one at:
https://signin.aws.amazon.com/signup?request_type=register
1. Create an S3 Bucket
This is the “container” where your files will be stored.
Log in to your AWS account and navigate to the Amazon S3 Console
Create a new bucket
Click the orange Create bucket button. Configure the following:
- Bucket name: Enter a globally unique name (e.g.,
spacedf-storage-yourname). - AWS Region: Choose a region close to your users (e.g.,
Sydney (ap-southeast-2)) - Block Public Access: Keep “Block all public access” checked (Enabled) for security. SpaceDF handles access control internally.
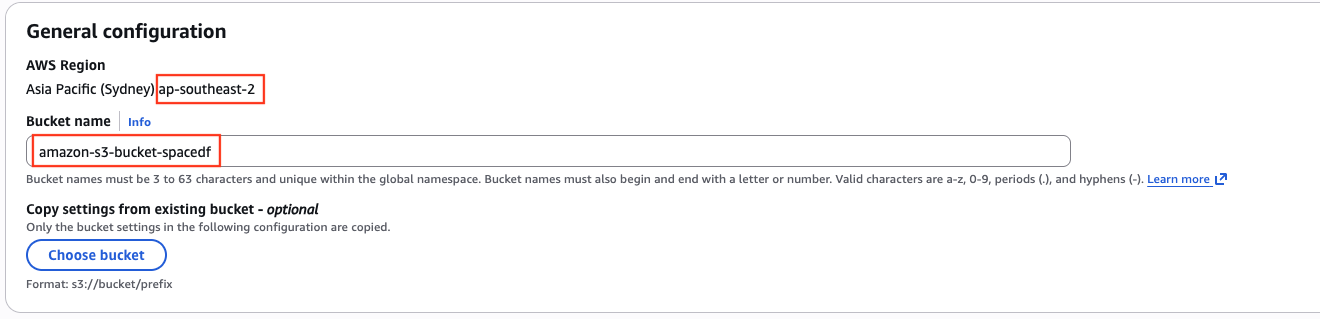
Finish
Scroll to the bottom and click Create bucket. Note down your Bucket Name and Region Code.
Refer: Official AWS Guide on Creating Buckets
2. Create IAM Credentials
Now you need to create a “Service User” that has permission to read/write to that bucket.
Create IAM credentials
Open the AWS IAM Console and click Users in the left sidebar.
Add User
Click Create user.
- User name: Enter a name like
spacedf-s3-user. - Click Next.
Set Permissions
- Select Attach policies directly.
- In the search bar, type
AmazonS3FullAccess. - Check the box next to
AmazonS3FullAccess - Click Next, then click Create user
Note: For advanced security, you can create a custom policy restricted to a single bucket later
Generate Keys
- Click on the user name you just created.
- Go to the Security credentials tab
- Scroll down to Access keys and click Create access key.
- Select Application running outside AWS
- Click Next -> Click Create access key.
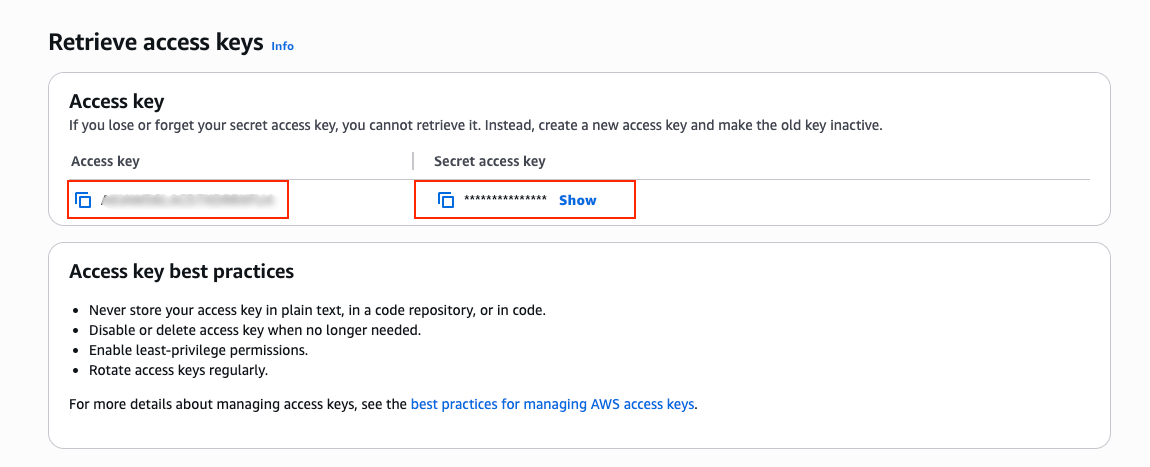
⚠️ Important: This is the only time you can view the Secret access key. Copy it immediately or download the .csv file
Refer: Managing Access Keys in IAM
3. Update Environment
Open your .env file and fill in the values from the previous steps.
# AWS S3 Configuration
AWS_ACCESS_KEY_ID="your_access_key_id_from_phase_2"
AWS_SECRET_ACCESS_KEY="your_secret_key_from_phase_2"

AWS_STORAGE_BUCKET_NAME="your_bucket_name_from_phase_1"
AWS_REGION="your_region_code"
Variable Details:
AWS_ACCESS_KEY_ID: The ID connecting to your IAM user.AWS_SECRET_ACCESS_KEY: The password for the IAM user.AWS_STORAGE_BUCKET_NAME: The name of your bucket (e.g.,my-app-storage).AWS_REGION: The code for your region.
Redis
RequiredSpaceDF uses Redis for caching data and handling background tasks (like sending emails).
1. Default Configuration (Docker)
If you are installing SpaceDF using the standard Docker setup, you do not need to change this.
REDIS_HOST="redis://redis:6379/1"❓ Why In our Docker setup, the service is named redis. SpaceDF automatically finds it at this address.
2. External Configuration (Advanced)
Only change the value if your Redis runs on a different server (e.g., AWS ElastiCache, DigitalOcean Managed Redis).
ℹ️ Syntax with Password: If your Redis requires a password, follow this format:
redis://:PASSWORD@HOST:PORT/DB_INDEX
Example:
# Example for external Redis with password
REDIS_HOST="redis://:mypassword123@192.168.1.50:6379/0"
3. Connection Details
Breakdown of the connection string components:
Component | Description | Example |
|---|---|---|
redis:// | Protocol | Always redis:// |
:password@ | (Optional) Password prefix | :secret123@ |
host | Server IP or Domain | localhost or 192.168.x.x |
:6379 | Port number | Default is 6379 |
/1 | Database Index (0-15) | /1 |
Service Credentials
RequiredThe following services (Dashboard & Device) operate independently. Each requires its own Database Password and unique Secret Key to function securely.
🔐 Security Rule Do not reuse the same password or secret key across different services.
Generate a unique value for each variable below.
1. Generate Secret Keys Run this command twice to generate two different keys:
openssl rand -hex 322. Update .env Update the values for both the Dashboard and Device services.
# --- Dashboard Service ---
# Password for Dashboard Database
DASHBOARD_POSTGRES_PASSWORD=your_dashboard_db_password
# Secret Key for Dashboard (Paste generated key 1)
DASHBOARD_SECRET_KEY=your_dashboard_secret_key

# --- Device Service ---
# Password for Device Database
DEVICE_POSTGRES_PASSWORD=your_device_db_password
# Secret Key for Device (Paste generated key 2)
DEVICE_SECRET_KEY=your_device_secret_key
Telemetry service
RequiredThis variable points to the internal Docker container that handles device data.
Configuration In 99% of cases (Local & Production), you should keep the default value.
# Default (recommended)
TELEMETRY_SERVICE_URL=http://telemetry:8080
❓ Why
- No Action Needed: This service runs automatically inside Docker.
- Internal Access: SpaceDF uses this URL to talk to the service internally. It does not need a public domain or HTTPS.
When to change this?
Only modify this value if you have manually customized the docker-compose.yml file to run the Telemetry service on a different port or server.
EMQX Service
RequiredEMQX is the core engine that handles real-time messages from your devices. SpaceDF needs to connect to the EMQX Management API to control it.
1. API Connection (Internal) Use the default value if you are running SpaceDF via Docker.
EMQX_HOST=http://emqx:18083/api/v52. Admin Credentials Define the username and password SpaceDF will use to log in to EMQX.
EMQX_USERNAME=your_secure_username
EMQX_PASSWORD=your_secure_password
⚠️ Consistency: These credentials must match the admin user defined in your EMQX configuration (or Dashboard).
Broker Bridge Service
RequiredThe Bridge Service acts as a listener. It connects to the MQTT Broker to receive device data and forward it to SpaceDF.
1. Broker Authentication
Enter the credentials required to connect to the MQTT Broker (usually the same credentials used for EMQX clients).
MQTT_BROKER_BRIDGE_USERNAME=your_bridge_username
MQTT_BROKER_BRIDGE_PASSWORD=your_bridge_password
2. Topic Subscription
Define which MQTT topics SpaceDF should listen to.
MQTT_TOPICS=device/+/telemetry,device/+/statusSyntax Guide:
- Comma (
,): Use to separate multiple topics. - Plus (
+): Wildcard for a single level (e.g., matching any device ID). - Hash (
#): Wildcard for all remaining levels.
📝 Example: device/+/telemetry will match device/sensor-01/telemetry and device/sensor-02/telemetry.
Email Service (AWS SES)
RequiredSpaceDF uses AWS SES (Simple Email Service) to send account verification emails, password resets, and notifications.
1. Setup & Verify
Before sending emails, you must tell AWS which email address or domain you own.
Go to SES Console
Log in to AWS and open the Amazon SES Console .
Verify Identity
- Go to Configuration -> Verified identities.
- Click Create identity.
- Choose Email address (easiest) or Domain.
- Check your inbox and click the verification link sent by AWS.
Refer: AWS Guide on Verifying Identities
2. Get SMTP Credentials
⚠️ Crucial Distinction: Do not use your standard AWS Access Keys.
You must generate specific SMTP Credentials.
Create Credentials
- Go to SMTP Settings in the left sidebar.
- Click the button Create SMTP credentials.
Copy Keys
- Click Create.
- Download the credentials or copy the SMTP Username and SMTP Password immediately.
Refer: AWS Guide on Obtaining SMTP Credentials
3. Update Environment
Update the .env file with the SMTP credentials you just created.
# Acount AWS to access to SES service
EMAIL_HOST_USER=AKIA... #(Your SMTP Username)
EMAIL_HOST_PASSWORD=BAj... #(Your SMTP Password)
DEFAULT_FROM_EMAIL="no-reply@yourdomain.com"
Variable Details:
EMAIL_HOST_USER: The username specifically generated for SMTP (starts withAKIA...usually).EMAIL_HOST_PASSWORD: The long secret string for SMTP authentication.DEFAULT_FROM_EMAIL: The email address that will appear as the sender (Must be verified in Phase 1).
MPA Service
RequiredThe MPA Service connects to the MQTT Broker to process application events. It acts as a client that listens for device messages.
Configuration
Update the .env file with the connection details below.
# --- Connection Settings ---
# Hostname (Use 'emqx' if running inside Docker)
MQTT_BROKER=emqx
# Port (1883 for TCP, 8883 for SSL/TLS)
MQTT_PORT=1883
# Unique name for this client
MQTT_CLIENT_ID=spacedf-mpa-client
# Topics to subscribe to (use '+' for wildcards)
MQTT_TOPIC=devices/+/events

# --- Authentication ---
MQTT_USERNAME=mpa_user
MQTT_PASSWORD=change_this_to_secure_password
Variable Details
MQTT_BROKER: The IP or Hostname of the broker.MQTT_PORT:1883(Plain) or8883(Secure).MQTT_TOPIC: The data channel to listen to.MQTT_USERNAME: Must match a user created in EMQX.MQTT_PASSWORD: The password for the user above.
⚠️ Production Tips:
- Use TLS: In a live environment, change the port to 8883 for encrypted connections.
- Client ID: Ensure
MQTT_CLIENT_IDis unique. If you run multiple instances of SpaceDF, they cannot share the same ID
Bootstrap Service
RequiredThe Bootstrap Service is the main backend API of SpaceDF. It orchestrates the system setup and handles requests from your frontend applications.
1. API URL (HOST)
This variable defines the public address where your Backend API is accessible.
Development (Local)
For Localhost: Use this default value if you are running SpaceDF on your computer.
HOST=http://localhost:8000 2. Access Control (CORS)
This setting controls which websites (frontends) are allowed to talk to your backend.
This prevents unauthorized websites from using your API.
⚠️ Syntax Rule:
- List all frontend URLs exactly (including
http/httpsand port). - Separate multiple URLs with a comma (
,) andno spaces.
Development (Local)
Allow Local Ports: List all the local ports your frontend apps use (e.g., Dashboard on 3000, Admin portal on 3001).
CORS_ALLOWED_ORIGINS=http://localhost:3000,http://localhost:3001 ⚠️ Common Mistake:
- If you change a frontend port (e.g., from
3000to4000) indocker-compose.yml, you must update this list to includehttp://localhost:4000 - If you forget, the app will show a
Network ErrororCORS-ERROR.
3. Security Key
This key secures the internal operations of the backend.
Generate Key
openssl rand -hex 32Update .env
BOOTSTRAP_SECRET_KEY=paste_your_generated_key_hereOrganization Initialization
RequiredThese settings are used to generate the Super Admin account and the Default Organization when SpaceDF runs for the very first time.
1. Setup Credentials
Define your organization name and the login credentials for the owner.
# Replace with your own values.
ORG_NAME="My IoT Company"
OWNER_EMAIL="admin@your-domain.com"
OWNER_PASSWORD="change_this_to_a_secure_password"
2. Variable Details
ORG_NAME- The display name of your organization (e.g., “SmartHome Solutions”)OWNER_EMAIL- The email address used to log in as the System Administrator.OWNER_PASSWORD- The master password for the admin account. Must be strong.
ℹ️ How to change these later?
- To change Password/Email: Log in to the Dashboard and go to Profile Settings.
- To change Organization Name: Log in to the Dashboard and go to Organization Settings.
(Modifying the.envfile after installation will have no effect).
These .env values are only read during the initial installation.
⭐ Branding: The ORG_NAME helps brand your system immediately. In production, you can point your custom domain (e.g., iot.your-brand.com) to the server to fully white-label the platform.
🎉 You have now finished configuring the backend services.
Next, continue with the frontend (web app) configuration.
Admin Portal Configuration
The Admin Portal is your central command center. It allows Platform Administrators to manage organizations, users, and system-wide settings.
(Note: This interface is for you and your staff, not for your end-users).
- NextAuth.js Documentation - General guide and concepts.
- Environment Variables - Detailed list of all available options.
- Security Guide - Best practices for securing your authentication.
SpaceDF uses NextAuth.js for its authentication layer. If you need to customize behavior or debug specific issues, please refer to the official documentation:
⚠️ Prerequisite Check: Please ensure you have fully configured the Backend Services section above.
The Admin Portal cannot function without a running backend.
Authentication & URLs
RequiredThis section secures user sessions and defines the public address of your Admin Portal.
1. Generate Secret Key Create a unique key to encrypt login sessions. Run this command in your terminal:
openssl rand -hex 32Update the value in your .env file:
# Replace with the generated string
PORTAL_NEXTAUTH_SECRET=your_generated_secret_key
2. Configure Domain Set the URL where administrators will access the portal.
Development (Local)
For Localhost: Use this setup if you are running the portal on your computer.
HOST_FRONTEND_ADMIN=http://localhost:3001
PORTAL_NEXTAUTH_URL=http://localhost:3001 Variable Details:
PORTAL_NEXTAUTH_SECRET: The encryption key for cookies/tokens. Keep this private.HOST_FRONTEND_ADMIN: The public URL shown in the browser address bar.PORTAL_NEXTAUTH_URL: The base URL used internally by the authentication system for callbacks.
Backend Connection (API)
The Admin Portal needs to communicate with the Backend API to handle user authentication and data retrieval.
Choose your deployment scenario:
Docker (Recommended)
Scenario: All-in-One (Docker Compose) If you are running both the Frontend and Backend on the same server using our provided Docker setup, use the internal service name.
# Connects internally via the Docker network
PORTAL_AUTH_API=http://haproxy:3000
❓ Why not localhost Inside a Docker container, localhost refers to the container itself, not your computer. Using haproxy allows the Portal to find the API within the internal Docker network.
Variable Details:
PORTAL_AUTH_API- The endpoint the Admin Portal uses to make server-side requests to the Backend.
⭐ References
- NextAuth.js Documentation - General guide and concepts.
- Environment Variables - Detailed list of all available options.
- Security Guide - Best practices for securing your authentication.
Dashboard Configuration
The Dashboard is the primary interface for End Users (your customers). It is used for daily operations, including real-time device monitoring, data visualization, and asset control.
- NextAuth.js Documentation - General guide and concepts.
- Environment Variables - Detailed list of all available options.
- Security Guide - Best practices for securing your authentication.
SpaceDF uses NextAuth.js for its authentication layer. If you need to customize behavior or debug specific issues, please refer to the official documentation:
⚠️ Prerequisite Check: Please ensure you have fully configured the Backend Services section above.
The Dashboard requires the Backend API and MQTT Broker to be running to fetch data.
Authentication & URLs
RequiredThis section secures user sessions and defines the public address of your Dashboard.
1. Generate Secret Key Create a unique key to encrypt login sessions. Run this command in your terminal:
openssl rand -hex 32Update the value in your .env file:
# Replace with the generated string
DASHBOARD_NEXTAUTH_SECRET=your_generated_secret_key
2. Configure Domain Set the URL where end-users will access the dashboard.
Development (Local)
For Localhost: Use this setup if you are running the dashboard on your computer
DASHBOARD_NEXTAUTH_URL=http://localhost:3000Variable Details:
DASHBOARD_NEXTAUTH_SECRET: The encryption key for cookies/tokens. Keep this private.DASHBOARD_NEXTAUTH_URL: The public URL (Base URL) used by the authentication system for redirects and callbacks.
Backend Connection (API)
RequiredThe Dashboard needs to communicate with the Backend API to fetch user data, device status, and charts.
Choose your deployment scenario:
Docker (Recommended)
Scenario: All-in-One (Docker Compose) If you are running both the Dashboard and Backend on the same server using our Docker setup, use the internal service name.
# Connects internally via the Docker network
DASHBOARD_AUTH_API=http://haproxy:3000
ℹ️ Network Note: Do not use localhost here. Inside the Docker network, haproxy is the correct hostname to reach the API gateway.
Variable Details:
DASHBOARD_AUTH_API- The endpoint the Dashboard uses for server-side data fetching and authentication.
Map Services
OptionalSpaceDF uses MapTiler to provide map visualization and Reverse Geocoding (converting GPS coordinates into readable addresses like “123 Main St”).
ℹ️ What happens if I skip this? The Dashboard will still work, but you will not see street addresses.
Locations will only be displayed as raw latitude/longitude coordinates (e.g., 10.762, 106.660).
Setup Instructions:
Create Account
Sign up for a free account at MapTiler
Get API Key
Go to the Keys section in your MapTiler dashboard and copy your Default Key.
Update .env
Paste the key into your .env file.
 # Replace with your API Key.
MAPTILER_API_KEY=__MAPTILER_API_KEY__MQTT (Real-time Data)
RequiredThe Dashboard connects directly to the MQTT Broker via WebSockets to display real-time charts and device status updates. Without this, the dashboard will not update live.
Configuration by Environment:
Development (Local)
For Localhost: Use ws (Unencrypted WebSocket) for local development.
# 1. Connection Details
DASHBOARD_MQTT_PROTOCOL=ws
DASHBOARD_MQTT_PORT=8083
DASHBOARD_MQTT_BROKER=localhost

# 2. Public Auth (Read-Only User recommended)
DASHBOARD_MQTT_USERNAME=dashboard_user
DASHBOARD_MQTT_PASSWORD=your_password
(Note: Ensure Port
8083is exposed in your EMQX Docker container).
Variable Details:
DASHBOARD_MQTT_PROTOCOL:wsfor local,wssfor production (SSL).DASHBOARD_MQTT_BROKER: The domain pointing to your MQTT Broker.DASHBOARD_MQTT_PORT: The WebSocket port (Default EMQX:8083for ws,8084for wss).
⚠️ Browser Security Rule: If your Dashboard runs on HTTPS (Production), you cannot use ws (insecure).
You MUST use wss. Failing to do so will cause “Mixed Content” errors, and the connection will fail.
🎉 Configuration Fully Complete!
You have successfully configured the Backend APIs, Admin Portal, and User Dashboard. Your SpaceDF environment is ready.
👉 Next Step: Proceed to the Starting the Services section to launch your platform.
Starting and Stopping
This section explains how to manage the lifecycle of your SpaceDF instance using standard Docker commands.
⚠️ Prerequisite: Ensure your .env file is fully configured and saved in the root directory before running these commands.
Starting the Services
To launch SpaceDF, you will use the provided entrypoint script. This script handles the initialization and orchestrates the Docker containers for you.
Run the following commands in your terminal:
# 1. Grant execution permission (First time only)
chmod +x entrypoint.sh

# 2. Start the system
./entrypoint.sh
What happens next?
- The script will trigger Docker to download necessary images and start all services in detached mode (background).
- You can close the terminal window without stopping the application.
🔍 Troubleshooting: If you see a Permission denied error, ensure you have run the chmod +x command successfully.
Checking service status
After running the startup script, verify that all containers are functioning correctly.
1. Check Status Command Run the following command to list all active services:
docker compose ps2. Expected Output Give the system about 30-60 seconds to initialize. You should see a list of services where the status column shows Up (healthy).
Within a minute, most services should show a status similar to:
NAME                IMAGE               STATUS                  PORTS
spacedf-backend     spacedf/backend     Up (healthy)            0.0.0.0:8000->8000/tcp
spacedf-dashboard   spacedf/dashboard   Up (healthy)            0.0.0.0:3000->3000/tcp
emqx                emqx/emqx           Up (healthy)            1883/tcp, 8083/tcp...
postgres            postgres:15         Up (healthy)            5432/tcp
ℹ️ Note on “starting” status: If you see Up (starting), it means the service is still initializing (e.g., waiting for the database). Wait a moment and run the command again.
🔍 Troubleshooting: If any service shows Exited (1) or Unhealthy, please check the logs using: docker compose logs -f <service_name>
Troubleshooting startup issues
If a service shows a status like Exited, Restarting, or remains Created for too long, it means the container failed to start correctly.
1. View Service Logs To identify the specific error, inspect the logs of the problematic service.
# Syntax: docker compose logs -f <service_name>
docker compose logs -f backend-f: Follows the log output in real-time (pressCtrl+Cto exit).- Replace
backendwith the name of the failing service (e.g.,dashboard,emqx,postgres)
2. Common Error Patterns When reviewing the logs, look for these common issues:
| Error Type | Log Message Example | Solution |
|---|---|---|
| Missing Config | KeyError: 'DATABASE_URL' or Config validation failed | Check your .env file. A required variable is missing or empty. |
| Connection | Connection refused or PGSQL connection failed | The service cannot reach a dependency (like the Database). Wait a moment, or check if it runs. |
| Permission | EACCES: permission denied | File permission issue (often happens with scripts). Run chmod +x on entry scripts. |
⭐ Pro Tip: If you see Connection refused immediately after starting, wait 10-20 seconds. Sometimes services start faster than the Database, causing a temporary error before they automatically retry and succeed.
Stopping the services
To gracefully shut down the SpaceDF platform and release system resources, run the following command:
docker compose downData Persistence: Rest assured, this command only removes the containers. Your database, user accounts, and device logs are stored in persistent volumes and will be preserved.
⭐ Operational Tips:
- When to stop: It is recommended to stop the services before making major changes to the
.envfile ordocker-compose.yml. - Restarting: To apply new configurations or updates, simply run
./entrypoint.sh(ordocker compose up -d) again after stopping.
⛔ Caution: Do not use the -v flag (e.g., docker compose down -v) unless you intend to permanently delete all your data and start from scratch.
Accessing SpaceDF Services
Once all containers are running successfully, you can access the various components of the SpaceDF platform using the URLs below.
Service | Port |
|---|---|
| Dashboard | localhost:3000 |
| Admin Portal | localhost:3001 |
| Backend API | localhost:8000 |
| EMQX (API) | localhost:18083 |
| MQTT (WebSocket) | localhost:8883 |
⭐ Login Credentials:
- Apps (Dashboard/Admin): Log in using the
OWNER_EMAILandOWNER_PASSWORDyou defined in the.envfile. - EMQX Console: Log in using
admin/public(Default) or the credentials defined inEMQX_PASSWORD.
Production URLs
If you have deployed to a live server, replace localhost with your configured domains:
- Dashboard:
https://dashboard.yourdomain.com - Admin Portal:
https://admin.yourdomain.com - API:
https://api.yourdomain.com
Updating
SpaceDF frequently releases stable updates to introduce new features, security patches, and performance improvements. To keep your self-hosted instance running smoothly, we recommend keeping it up to date.
⚠️ Downtime Notice: The update process requires restarting Docker containers. Your services will be temporarily unavailable (usually for a few seconds to a minute) during the restart phase. Plan accordingly.
Standard Update Procedure
Run the following commands in your terminal to upgrade your deployment.
Fetch Latest Configuration
Update your local repository to get the latest docker-compose.yml and script changes.
git pull origin mainDownload Updated Images
Pull the latest versions of the SpaceDF Docker images.
docker compose pull Apply & Restart
Recreate the containers with the new images.
docker compose up -d(Note: Docker will only restart containers that have updates).
⭐ Cleanup (Optional): After a major update, you can remove old, unused images to free up disk space: docker image prune -f
Updating individual services (advanced)
You can run a specific version of a service by changing its Docker image tag in the docker-compose.yml file.
Running mixed versions of services is not guaranteed to be compatible.
This approach is recommended only if you know exactly what you are doing.
Advanced: Pinning & Rolling Back Versions
In specific scenarios—such as rolling back a buggy update or testing a beta feature—you may need to force a specific version of a service instead of using latest.
⛔ Compatibility Risk: SpaceDF services are designed to work together as a suite. Running mixed versions (e.g., a simplified Dashboard with an advanced Backend) may lead to API errors, database conflicts, or data corruption.
Only proceed if you understand the dependencies.
Procedure: Update a Single Service
Follow these steps to update (or downgrade) a specific component, for example, the Dashboard.
Find the Version Tag
Visit the SpaceDF Container Registry to find the exact tag you need (e.g., v2026.01.21).
Edit Configuration
Open docker-compose.yml and locate the service (e.g., dashboard). Replace the image tag with your chosen version.
services:
  dashboard:
    # Change the tag after the colon
image: ghcr.io/space-df/spacedf-web-app:v2026.01.21Apply Changes (Smart Restart)
Run the following commands to pull and restart only the target service, leaving the rest of the system running.
# 1. Pull the specific image
 docker compose pull dashboard

# 2. Recreate only this container
 docker compose up -d dashboard
❓ Why not use docker compose down Using down stops the entire platform. By targeting up -d dashboard, you only restart the Dashboard, ensuring that the Backend and MQTT Broker continue to process device data without interruption.
Maintenance Strategy & Resources
Managing updates effectively is key to maintaining a stable IoT platform.
ℹ️ Downtime Considerations:
- Restart Required: Applying updates always requires restarting the Docker containers.
- Service Interruption: Active users will experience a brief disconnection (typically 10-60 seconds) while the containers re-initialize.
- Best Time to Update: We strongly recommend scheduling maintenance during low-traffic periods (e.g., late night or weekends) to minimize the impact on your operations.
Staying Up to Date: To track the latest features, security patches, and bug fixes, please consult our official channels:
- SpaceDF Release Notes : High-level overview of new features and major changes.
- GitHub Changelog : Detailed technical log of all changes in the self-hosted repository.
Uninstalling
This section guides you through completely removing SpaceDF from your server.
⛔ CRITICAL WARNING: The steps below will permanently delete all data, including:
- User accounts and passwords.
- All device data and history.
- System configurations.
- Uploaded files.
Wipe Containers & Volumes
Run the following command in your project directory to stop services and destroy their internal data volumes.
 # The '-v' flag ensures volumes are deleted
 docker compose down -v
Clean Host Directories (Optional)
Docker might leave some mounted files on your host machine (usually inside the volumes/ folder). To ensure a 100% clean state, remove them manually.
# Remove Database files
rm -rf volumes/db/data

# Remove File Storage (Uploads/Images)
rm -rf volumes/storage
Verification
At this point, SpaceDF is completely removed.
- Containers: Stopped and deleted.
- Networks: Removed.
- Data: Wiped.
ℹ️ Reinstallation: If you want to start fresh, simply run the setup guide from the beginning. The system will treat it as a brand new installation.
Need Help?
- Community Forum - Get help from the SpaceDF community
- Discord Server - Real-time chat with other users and developers
- Documentation - Comprehensive guides and tutorials
- Professional Support - Enterprise support with SLA guarantees
Ready to start? Create your SpaceDF account and begin tracking your devices in minutes!